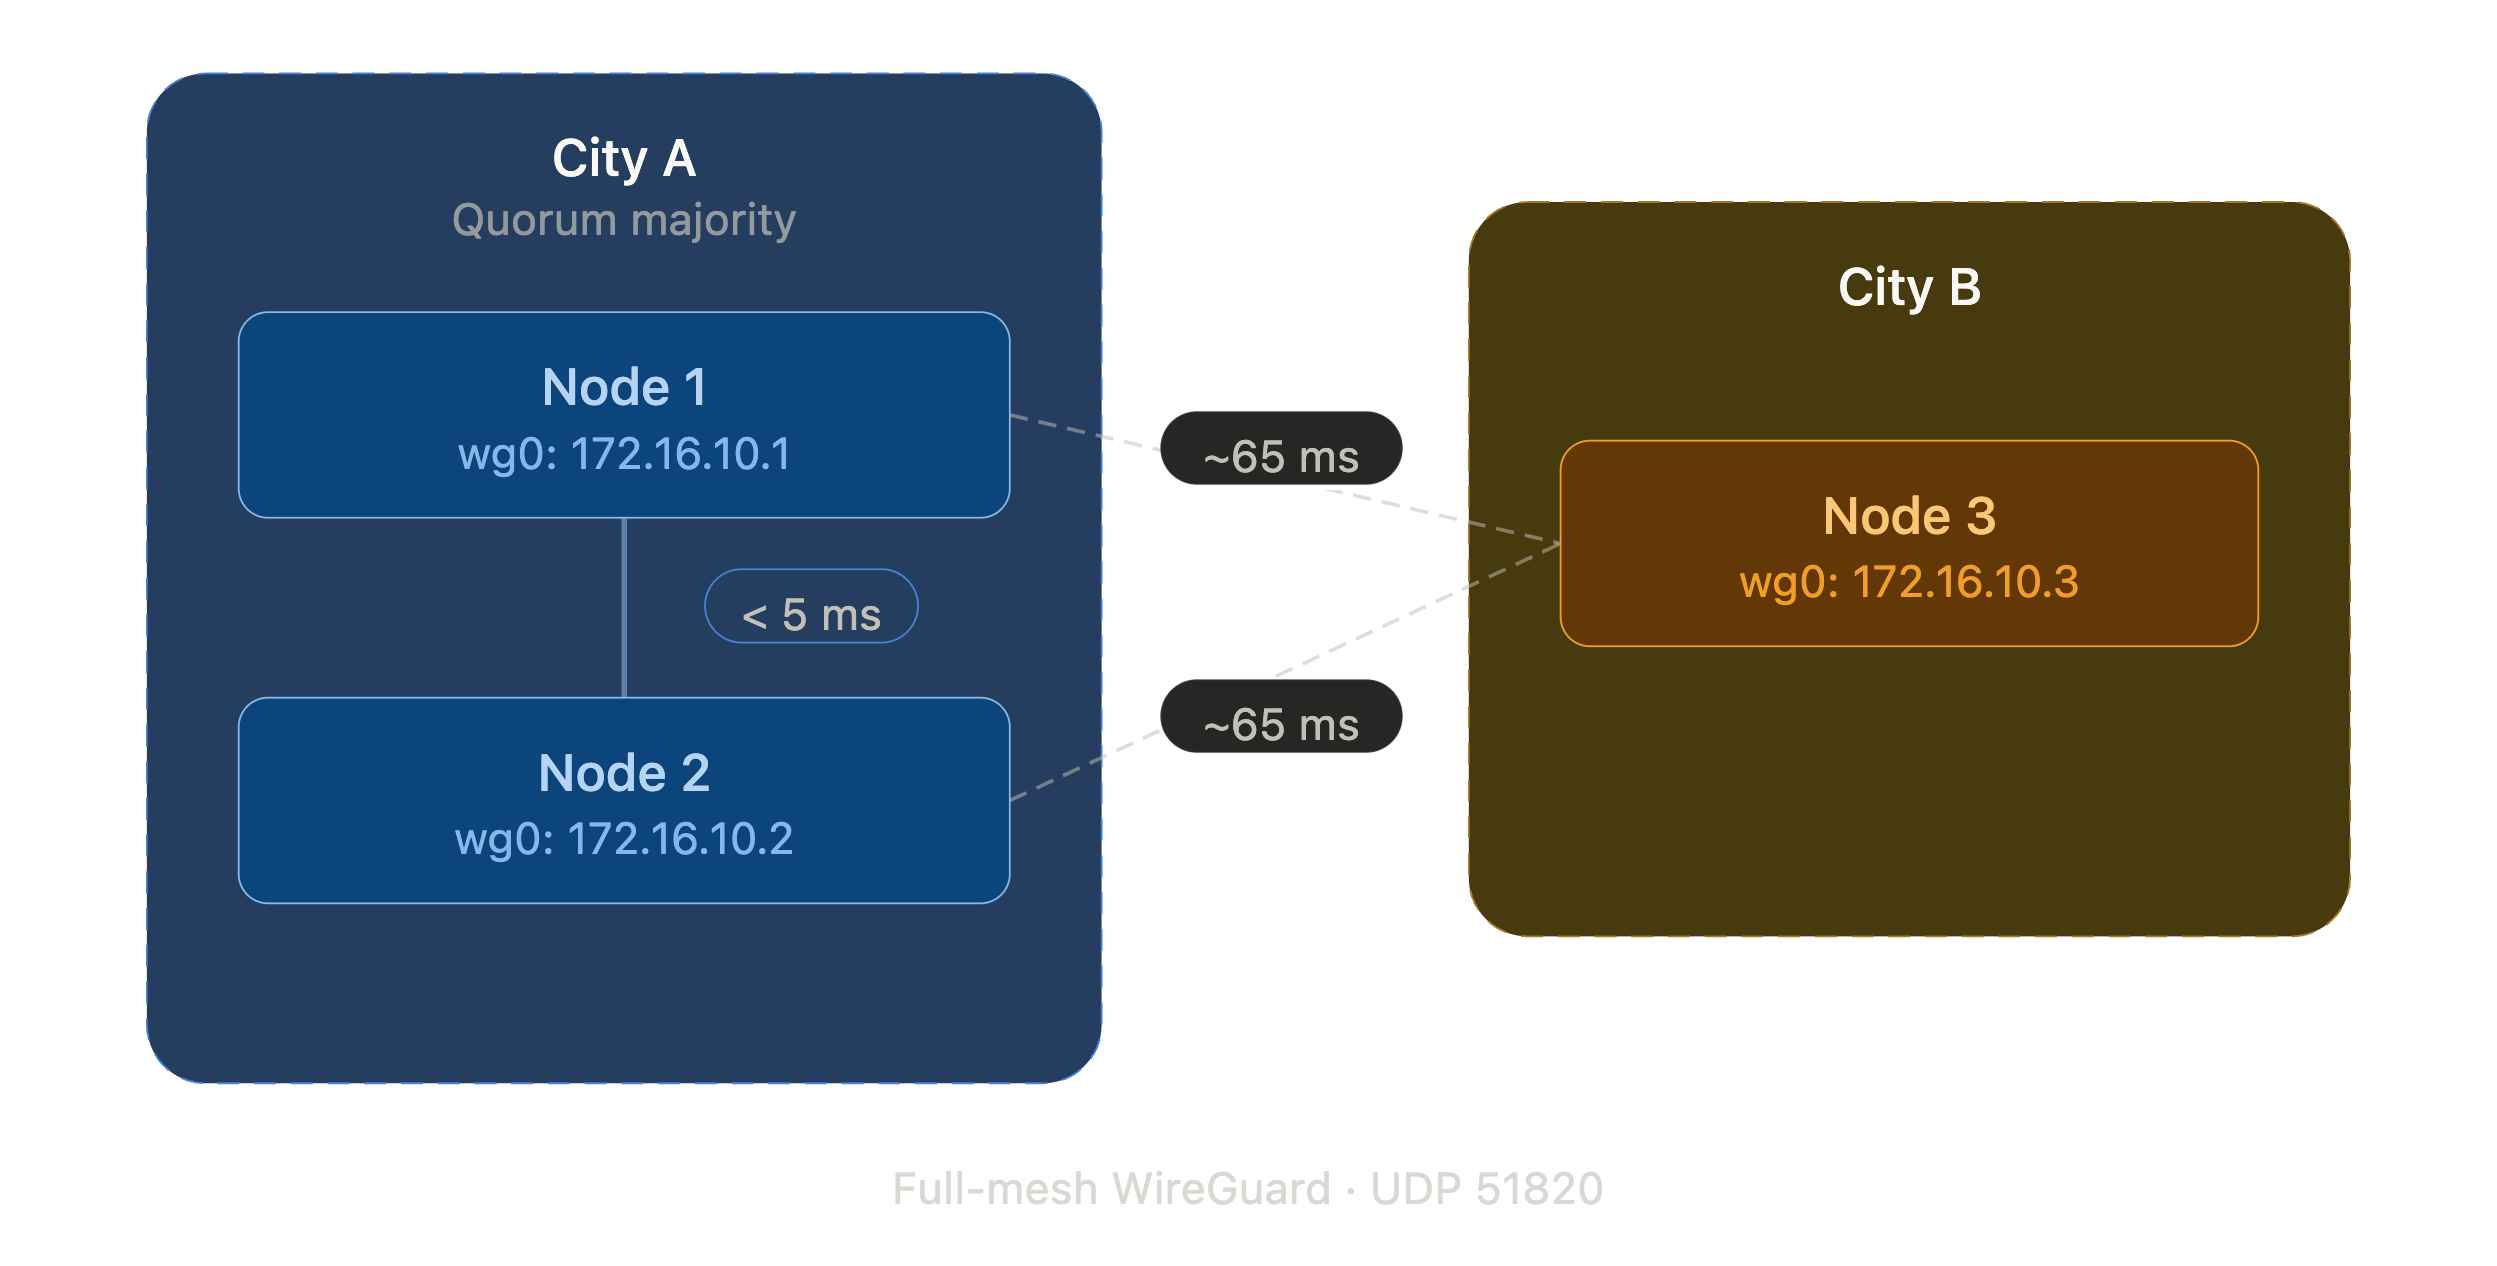
When Proxmox says “cluster,” they mean nodes connected by a low-latency private network. Same rack, same switch, sub-millisecond RTT. Their documentation recommends latencies under 5 milliseconds between nodes. This guide requires Proxmox VE 8.x or 9.x. The --link0 flag used below has been available since PVE 6.2. Much older versions use --bindnet0_addr which has different syntax.
That’s not what we had. We had three dedicated servers at a colocation provider. Two in one city, one across the country. Public IPs, no private interconnect, 65ms between sites. The kind of setup Proxmox explicitly warns you about.
We built it anyway. It works.
Credit Where It’s Due
Before we started, we found Tailmox by willjasen – a project that builds Proxmox clusters over Tailscale (which uses WireGuard under the hood). Tailmox proved the concept was viable and showed us patterns we borrowed: automated peer discovery, pre-flight connectivity validation before cluster formation, idempotent cluster join logic with programmatic certificate fingerprint extraction, and the use of expect for handling the password prompt in pvecm add.
We chose raw WireGuard instead of Tailscale to avoid a vendor dependency in the critical path, but the architecture is the same idea: build a private overlay, make Proxmox think the nodes are local.
The Setup
Three servers, each with a single 1GbE NIC and a public IPv4 address. No private VLAN, no bonding, no 10G. Just internet and WireGuard.
The goal: a full Proxmox VE cluster where every node can manage every other node, live migrate VMs (within the same site), and replicate storage across sites.
Step 1: Install WireGuard and Generate Keys
On each node:
apt install wireguard-tools -y
cd /etc/wireguard
umask 077
wg genkey | tee privatekey | wg pubkey > publickey
chmod 600 privatekey
The umask 077 ensures the private key file isn’t world-readable, but the explicit chmod is a safety net in case someone copies the wg genkey line without the umask.
Generate one preshared key per tunnel pair. With three nodes, that’s three PSKs. Run these on any one node:
wg genpsk > psk-node1-node2
wg genpsk > psk-node1-node3
wg genpsk > psk-node2-node3
chmod 600 psk-*
Then distribute the PSKs and public keys to the other nodes via scp. Since these are fresh installs where you control the servers, verify the SSH host fingerprints on first connection:
# From the node where you generated PSKs:
# Node 2 needs: psk-node1-node2, psk-node2-node3
scp psk-node1-node2 psk-node2-node3 root@<NODE2_PUBLIC_IP>:/etc/wireguard/
# Node 3 needs: psk-node1-node3, psk-node2-node3
scp psk-node1-node3 psk-node2-node3 root@<NODE3_PUBLIC_IP>:/etc/wireguard/
Distribute public keys the same way:
# Share public keys with peers (never share private keys)
scp /etc/wireguard/publickey root@<NODE2_PUBLIC_IP>:/etc/wireguard/node1-pubkey
scp /etc/wireguard/publickey root@<NODE3_PUBLIC_IP>:/etc/wireguard/node1-pubkey
# Repeat from each node, or collect all pubkeys on one node and distribute
When composing each node’s wg0.conf, read the peer public keys from these files: cat /etc/wireguard/node1-pubkey. Never transfer private keys between nodes.
Step 2: Configure the WireGuard Mesh
Each node gets a wg0.conf with a unique overlay IP. We used a dedicated /24 that doesn’t overlap with anything else in our network. Each node has two [Peer] sections pointing to the other two nodes.
# /etc/wireguard/wg0.conf (node 1 example)
[Interface]
Address = 172.16.10.1/24
PrivateKey = <NODE1_PRIVATE_KEY>
ListenPort = 51820
MTU = 1420
[Peer]
# Node 2
PublicKey = <NODE2_PUBLIC_KEY>
PresharedKey = <PSK_NODE1_NODE2>
Endpoint = <NODE2_PUBLIC_IP>:51820
AllowedIPs = 172.16.10.2/32
PersistentKeepalive = 25
[Peer]
# Node 3
PublicKey = <NODE3_PUBLIC_KEY>
PresharedKey = <PSK_NODE1_NODE3>
Endpoint = <NODE3_PUBLIC_IP>:51820
AllowedIPs = 172.16.10.3/32
PersistentKeepalive = 25
If you later route VM or SDN subnets across the tunnel, expand AllowedIPs to include those ranges (e.g., AllowedIPs = 172.16.10.2/32, <VM_SUBNET>). Without this, WireGuard drops packets for subnets not listed.
PersistentKeepalive = 25 keeps NAT mappings alive and ensures handshakes stay fresh. At three nodes this generates trivial background traffic. If scaling to many nodes, note that keepalive traffic grows quadratically with the number of peer pairs.
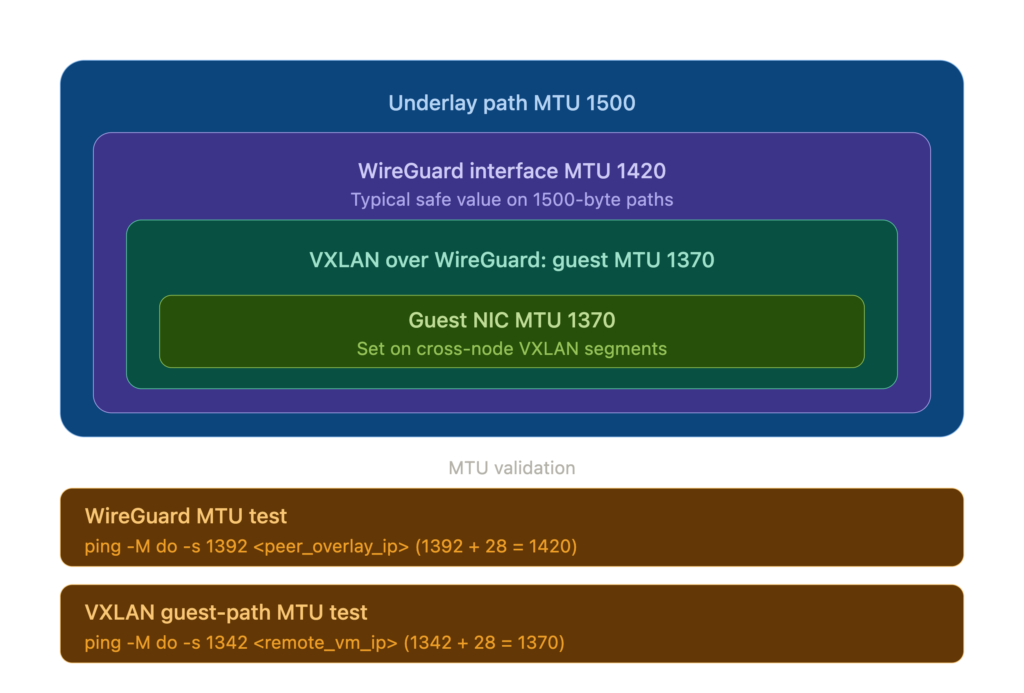
MTU matters. The WireGuard project recommends MTU 1420 for tunnels over standard 1500-byte links. This accounts for encapsulation overhead across both IPv4 and IPv6 outer transport. If you later run VXLAN over this tunnel (for Proxmox SDN), that adds ~50 bytes of encapsulation overhead, dropping VM MTU to 1370. Get this wrong and large packets silently disappear. Validate your tunnel MTU after setup:
ping -M do -s 1392 <peer_overlay_ip>(1392 payload + 28 bytes IP/ICMP header = 1420, the tunnel MTU). Test VM-level MTU from inside a VM by pinging a VM on another node:ping -M do -s 1342 <remote_vm_ip>(1342 + 28 = 1370, the VXLAN MTU). If the tunnel test fails, your underlying path MTU is below 1500 and you need to lower the WireGuard MTU accordingly. Configure VMs on cross-node VXLAN segments with MTU 1370 explicitly – do not rely on the default 1500, or large packets will be silently dropped.
Do not add SaveConfig = true to your wg0.conf. If present, wg-quick down overwrites the config file with runtime state, potentially clobbering preshared keys and endpoint addresses.
Enable and start on all nodes:
systemctl enable --now wg-quick@wg0
Verify the full mesh:
wg show wg0
ping -c 3 172.16.10.2
ping -c 3 172.16.10.3
Every node should show two peers, each with a “latest handshake” under 60 seconds. If handshakes show but pings fail, your firewall is blocking traffic on the WireGuard interface.
Step 3: Point /etc/hosts at the Overlay
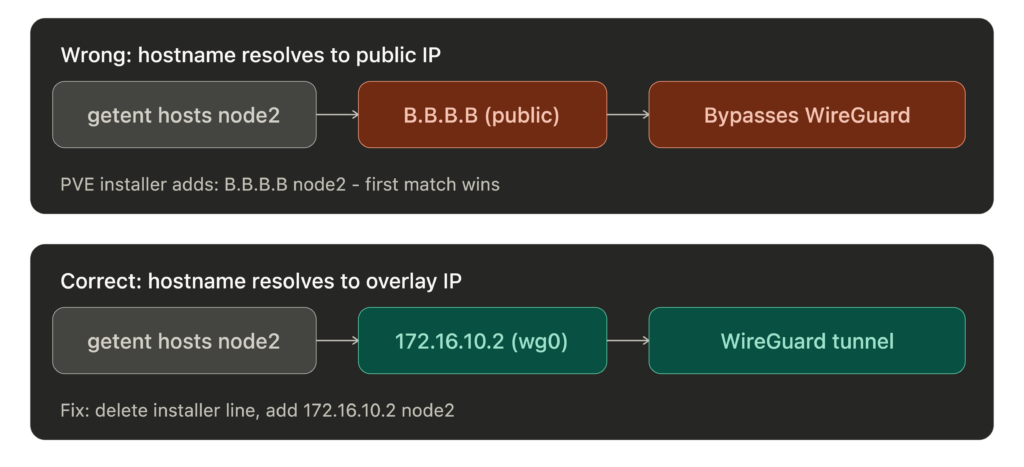
This is the critical trick. Proxmox resolves node hostnames from /etc/hosts. Corosync, pmxcfs, ZFS replication – they all use these hostnames. If they resolve to public IPs, cluster traffic bypasses the WireGuard overlay and travels the public network path instead. Corosync traffic is still encrypted by default (secauth: on) and ZFS replication uses SSH, but you lose the guarantee that all inter-node traffic stays on the tunnel. If they resolve to WireGuard IPs, everything flows through the overlay.
Important: The Proxmox installer creates a line like <PUBLIC_IP> node1.example.com node1 in /etc/hosts. You must remove or comment out that line. If it appears before your WireGuard entries, glibc’s resolver returns the first matching line, so getent hosts will return the public IP and cluster traffic will bypass the tunnel.
# /etc/hosts (same on all nodes)
127.0.0.1 localhost
# Remove the PVE installer line that maps hostname to public IP:
# <PUBLIC_IP> node1.example.com node1   <-- DELETE THIS
# Proxmox cluster - WireGuard overlay
172.16.10.1    node1  node1.example.com
172.16.10.2    node2  node2.example.com
172.16.10.3    node3  node3.example.com
Verify with
getent hosts node2. It must return the WireGuard IP, not the public IP. If it returns the public IP, your cluster traffic is bypassing the WireGuard overlay.
Step 4: Firewall the Public Interface
With WireGuard handling all cluster traffic, the public interface only needs to accept: the WireGuard UDP port, SSH from trusted IPs, the Proxmox GUI from trusted IPs, and whatever services you expose (HTTP/S, etc.). Everything else drops.
We use nftables. Two things we learned the hard way:
Use
iifname "wg0", notiif wg0. Theiifform resolves the interface index at ruleset load time. If WireGuard hasn’t started yet (common on reboot – nftables loads before wg-quick), the load fails and your entire firewall is down.iifnamedoes string matching at packet time and works regardless of boot order.
In an
inetfamily table, usednat ip toandsnat ip to, not plaindnat to. The inet family is dual-stack and nftables refuses to guess which protocol you mean.
#!/usr/sbin/nft -f
flush ruleset
table inet filter {
    chain input {
        type filter hook input priority 0; policy drop;
        iif lo accept  # iif safe: lo exists before nftables loads
        ct state established,related accept
        ct state invalid drop
        # WireGuard
        iif <PUBLIC_IFACE> udp dport 51820 accept  # iif is safe for interfaces that exist at ruleset load time
        # Proxmox GUI + SSH from trusted IPs (iif safe: physical NIC exists at boot)
        iif <PUBLIC_IFACE> ip saddr { <TRUSTED_IPS> } tcp dport { 8006, 22 } accept
        # WireGuard overlay - accept everything
        iifname "wg0" accept
        # ICMP (hardening: restrict types or add rate limit)
        ip protocol icmp accept
        ip6 nexthdr icmpv6 accept
        log prefix "nft-drop: " counter drop
    }
    chain forward {
        type filter hook forward priority 0; policy drop;
        ct state established,related accept
        # VM bridges <-> WireGuard tunnel (inter-node VM traffic)
        # Assumes all cluster nodes are trusted. A compromised node gets
        # full Layer 2 access to every VM bridge on every other node.
        iifname "vmbr*" oifname "wg0" accept
        iifname "wg0" oifname "vmbr*" accept
        # VMs to internet via NAT (restrict source to your VM subnet)
        iifname "vmbr*" oif <PUBLIC_IFACE> ip saddr <VM_SUBNET> accept
    }
    chain output {
        type filter hook output priority 0; policy accept;
    }
}
table inet nat {
    chain postrouting {
        type nat hook postrouting priority 100;
        # SNAT for VMs that need internet access
        # Assumes a static public IP. For DHCP/dynamic IPs, use masquerade instead.
        oif <PUBLIC_IFACE> ip saddr <PRIVATE_RANGE> snat ip to <PUBLIC_IP>
    }
}
Step 5: Form the Cluster
On the first node:
pvecm create <CLUSTER_NAME> --link0 172.16.10.1
The --link0 flag tells Corosync to bind to the WireGuard overlay IP instead of the public IP. This flag has been available since PVE 6.2.
Before joining other nodes, get the first node’s certificate fingerprint:
FP=$(timeout 5 openssl s_client -connect 172.16.10.1:8006 </dev/null 2>/dev/null | \
  openssl x509 -fingerprint -sha256 -noout | cut -d= -f2)
[ -z "$FP" ] && echo "ERROR: failed to get fingerprint - check wg0 and port 8006" >&2
echo "$FP" | grep -qEi "^([0-9a-f]{2}:){31}[0-9a-f]{2}$" || echo "WARNING: fingerprint looks malformed" >&2
echo "$FP"
Verify the output is a colon-separated hex string. If it’s empty, the connection failed – check that wg0 is up and port 8006 is listening. This runs over the WireGuard tunnel, which authenticates both peers cryptographically. Transport-path MITM risk is effectively eliminated by WireGuard’s peer authentication.
Then SSH into each joining node interactively and run:
# On node 2:
pvecm add 172.16.10.1 --link0 172.16.10.2 --fingerprint <FINGERPRINT>
# On node 3:
pvecm add 172.16.10.1 --link0 172.16.10.3 --fingerprint <FINGERPRINT>
If
pvecm addfails partway (network blip, wrong password), the joining node can be left in a half-joined state where re-running the command also fails. The joining node needs manual cleanup of/etc/pve,/etc/corosync, and/var/lib/corosync. The existing cluster may also have a stale node entry – remove it withpvecm delnode <nodename>from a healthy node before retrying. See the Proxmox wiki on cluster recovery.
Do not run
pvecm addvia non-interactive SSH (e.g.,ssh root@node2 "pvecm add ..."). It prompts for the first node’s root password and there’s no way to pass it non-interactively withoutexpect. SSH in, run it, enter the password.
After all nodes join:
pvecm status
You should see all nodes listed, quorum achieved.
Step 6: Tune Corosync for WAN Latency
Ensure all nodes have joined the cluster before proceeding. Run pvecm status and confirm every node is listed.
For a WAN-stretched cluster, this tuning is strongly recommended. The default Corosync token timeout is 3000ms (changed from 1000ms in Corosync 3.1.x, which PVE 8.x/9.x ships). With 65ms RTT plus internet jitter, a brief packet loss spike will cause Corosync to declare a node dead, which can lead to HA fencing if HA is configured. Edit /etc/pve/corosync.conf (auto-syncs to all nodes) and add these inside the totem {} block:
  token: 10000
  token_retransmits_before_loss_const: 10
  join: 1000
  send_join: 500
  merge: 400
Increment config_version by 1 and save. Timeout tuning auto-reloads when the config file is saved. If values don’t update, force a reload: systemctl restart corosync on each node, one at a time to maintain quorum. Verify:
corosync-cmapctl | grep -E 'totem\.(token|consensus|token_coefficient)'
Note: the runtime token value reported by corosync-cmapctl will be higher than what you configured. Corosync adds token_coefficient * (nodes - 2) at runtime. The coefficient is 650ms in Corosync by default, though newer Proxmox tooling may create clusters with token_coefficient: 125 set explicitly. Check runtime.config.totem.token in corosync-cmapctl output to see the effective value Corosync is actually using, rather than assuming either default.
When consensus is not explicitly set, Corosync auto-calculates it as 1.2 * token. With token at 10000, that’s 12000. The safest approach is to omit the consensus line and let Corosync auto-calculate it, which is what the config block above does. If you set it explicitly, never try to calculate it manually when changing the token – the actual constraint depends on other Corosync internals that vary by version.
Corosync encryption is already on. Proxmox sets secauth: on in the generated corosync.conf at cluster creation. This implies crypto_cipher=aes256 and crypto_hash=sha256 using the cluster authkey (/etc/corosync/authkey). Your Corosync traffic is encrypted by default – even if /etc/hosts is misconfigured or the tunnel path changes and Corosync reconnects over a non-tunnel path, the traffic is still encrypted. You can make the cipher and hash explicit in the totem {} block to make the config self-documenting:
  crypto_cipher: aes256
  crypto_hash: sha256
This pins the parameters rather than relying on the secauth implication. The values are the same – this is documentation, not a change in behavior.
The tradeoffs are real. A 10-second token with 10 retransmits means the cluster won’t declare a node dead for ~10 seconds. If a node actually crashes (not a network blip), the remaining nodes are in a potential split-brain window during those 10 seconds. For geo-distributed nodes on public internet where jitter routinely exceeds 1 second, the false-positive reduction is worth the slower crash detection. If your inter-node latency is lower, tighten these values. If your workloads are write-heavy with shared storage, consider whether 10 seconds of ambiguity is acceptable.
Step 7: Verify and Soak
Open the Proxmox GUI on any node. All nodes should appear in the cluster view. Create a test VM on one node and confirm it’s visible from the others.
Let it run for 24 hours before doing anything else. Monitor:
# Cluster status - all nodes present, quorate
pvecm status
# Corosync membership changes - should be empty after initial formation
journalctl -u corosync --since "24 hours ago" | grep -i "membership"
# Config version should be stable (not incrementing)
pvecm status | grep "Config Version"
Zero quorum membership changes is the pass criteria. If Corosync loses and regains quorum during the soak, your WAN tuning needs adjustment or the link has issues.
Things That Bit Us
nf_conntrack module. On a fresh PVE 9.x install, the nf_conntrack kernel module isn’t loaded. If your sysctl config sets nf_conntrack_max, sysctl will fail. Load and persist it:
modprobe nf_conntrack
echo "nf_conntrack" > /etc/modules-load.d/nf_conntrack.conf
Boot ordering. nftables loads before WireGuard. If your nftables config references the wg0 interface with iif instead of iifname, the firewall fails to load on every reboot and your node comes up with no firewall at all.
nft add rule ordering. If you try to fix a missing firewall rule at runtime with nft add rule, the new rule goes to the end of the chain – after your drop rule. It never gets evaluated. Always edit the config file and reload with nft -f /etc/nftables.conf.
Certificate hostname mismatch. PVE generates certificates for the hostname/IP configured during installation. When you join a cluster over WireGuard overlay IPs that weren’t in the original cert, pvecm add rejects the connection. The --fingerprint flag bypasses hostname verification.
Partial deployment recovery. If you automate any of this and the script fails partway through, some nodes will be fully configured and others won’t. We had a node where the WireGuard config was on disk but the service was never enabled. After any failed deployment, verify every service on every node – not just the one that errored.
Corosync boot ordering. On reboot, if corosync.service starts before [email protected], Corosync can’t reach any peers and you lose quorum until WireGuard comes up. Fix with a systemd drop-in:
mkdir -p /etc/systemd/system/corosync.service.d
cat > /etc/systemd/system/corosync.service.d/wireguard.conf << 'EOF'
[Unit]
[email protected]
[email protected]
EOF
systemctl daemon-reload
Deploy this on all nodes.
WireGuard runtime failure. If wg-quick@wg0 stops or crashes while the cluster is running, Corosync loses all peers simultaneously. In a three-node cluster, that’s immediate quorum loss. Monitor handshake age and alert if it exceeds 180 seconds.
PVE installer /etc/hosts line. The Proxmox installer adds a line mapping your hostname to the public IP. If you add your WireGuard overlay entries below it, the overlay entries are ignored because the first match wins. Remove the installer line before adding yours.
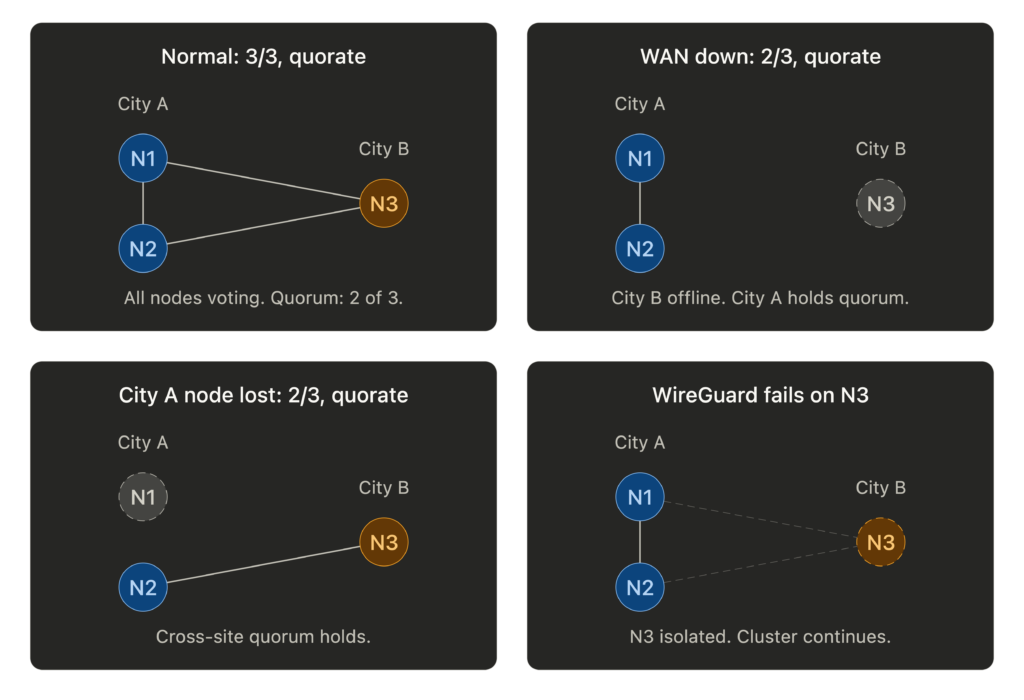
Quorum Math
With three nodes, quorum requires two. Think about what that means for your geography. If two nodes are in one city and one is remote, the two-node site always holds quorum. The remote node going offline (or the WAN link dropping) doesn’t affect cluster operations for the majority site. This is a feature, not a limitation.
Don’t enable Proxmox HA for VMs on the remote node initially. If the WAN link flaps, the quorum majority may fence the remote node to protect data consistency. Manage remote-site failover manually until you trust the link stability.
Bandwidth Reality
Everything shares one NIC: WireGuard overhead, Corosync heartbeats, VXLAN tunnels, VM traffic, ZFS replication. On 1GbE, a ZFS replication job can saturate the link and starve Corosync. Rate-limit replication, schedule it off-peak, and consider QoS to prioritize Corosync traffic. A dead Corosync heartbeat means a dead node declaration, and that cascades.
Was It Worth It?
We have a single Proxmox cluster spanning two cities with unified management, encrypted inter-node communication, and geographic redundancy. The GUI shows all nodes. Storage replication works across the WAN. VMs on the same site can live migrate. The WAN-tuned Corosync hasn’t lost quorum once during testing.
This isn’t how Proxmox is designed to be used. But WireGuard makes the nodes think they’re on a private LAN, and Corosync’s tunable timeouts handle the rest.
If you have bare metal in multiple sites and want a single cluster, this works.
You’re reading this from a VM on that cluster.
Thanks again to willjasen/tailmox for proving the concept and sharing the automation patterns that made this possible.
A note on PVE kernels: Proxmox ships its own kernel packages that include WireGuard natively. Avoid replacing the PVE kernel with a stock Debian or custom kernel, or WireGuard may break on upgrade.
Built with Proxmox VE 9.x, WireGuard, nftables, and stubbornness.